
Creating a New EMR
Recording a consultation and turning it into a SOAP note, with the patient chosen before or after recording.
This is Medisa's core flow: record the consultation conversation, then receive a draft SOAP note ready for your review.
Record first, choose the patient later
You don't need to look up or register the patient before you start recording. As soon as the patient sits down, press Start Recording and begin the consultation. The patient is assigned later, while you review the note, and before that note is verified.
| Situation | Fastest way |
|---|---|
| A new patient arrives, or the queue is busy | Record straight from the home screen. Assign the patient while reviewing the note |
| The patient is registered and you know who they are | Open the patient's page and record from there. The recording is linked to that patient right away |
| You still want to choose the patient first | Press Choose the patient first in the recording consent dialog |
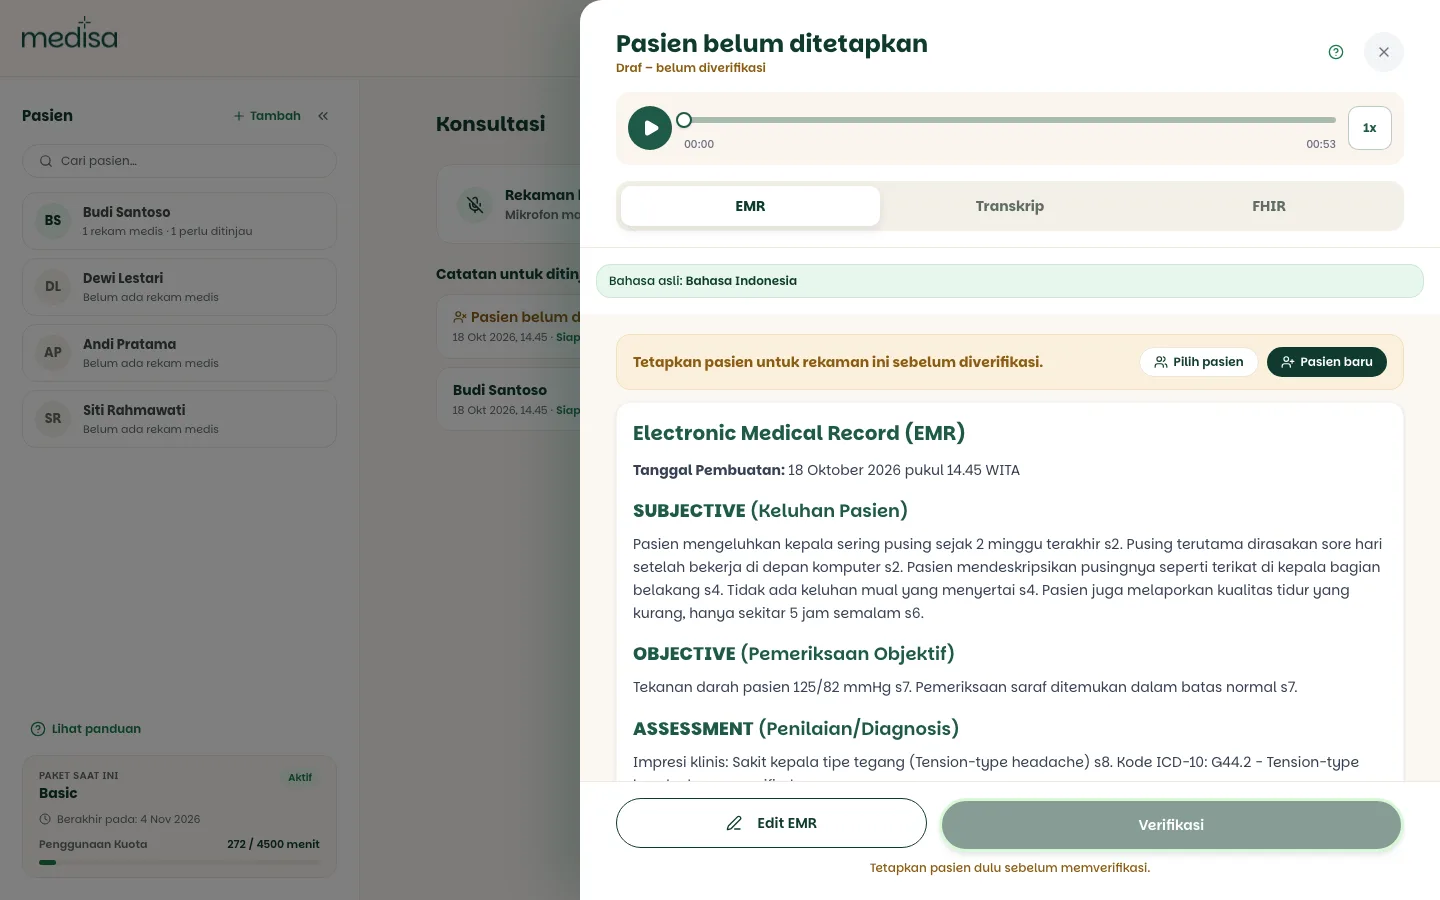
A note without a patient is still saved and can be reviewed. The only thing held back is Verify: a note can only be signed off once its patient is assigned.
Prerequisites
- You are signed in and have chosen a workspace. See Authentication.
- Microphone permission is granted in the browser.
- You have recording quota left. Remaining quota shows on the Current Plan card, below the patient list.
The patient does not need to be registered first. See Creating a Patient if you want to register them before the consultation.
The Consultations home screen
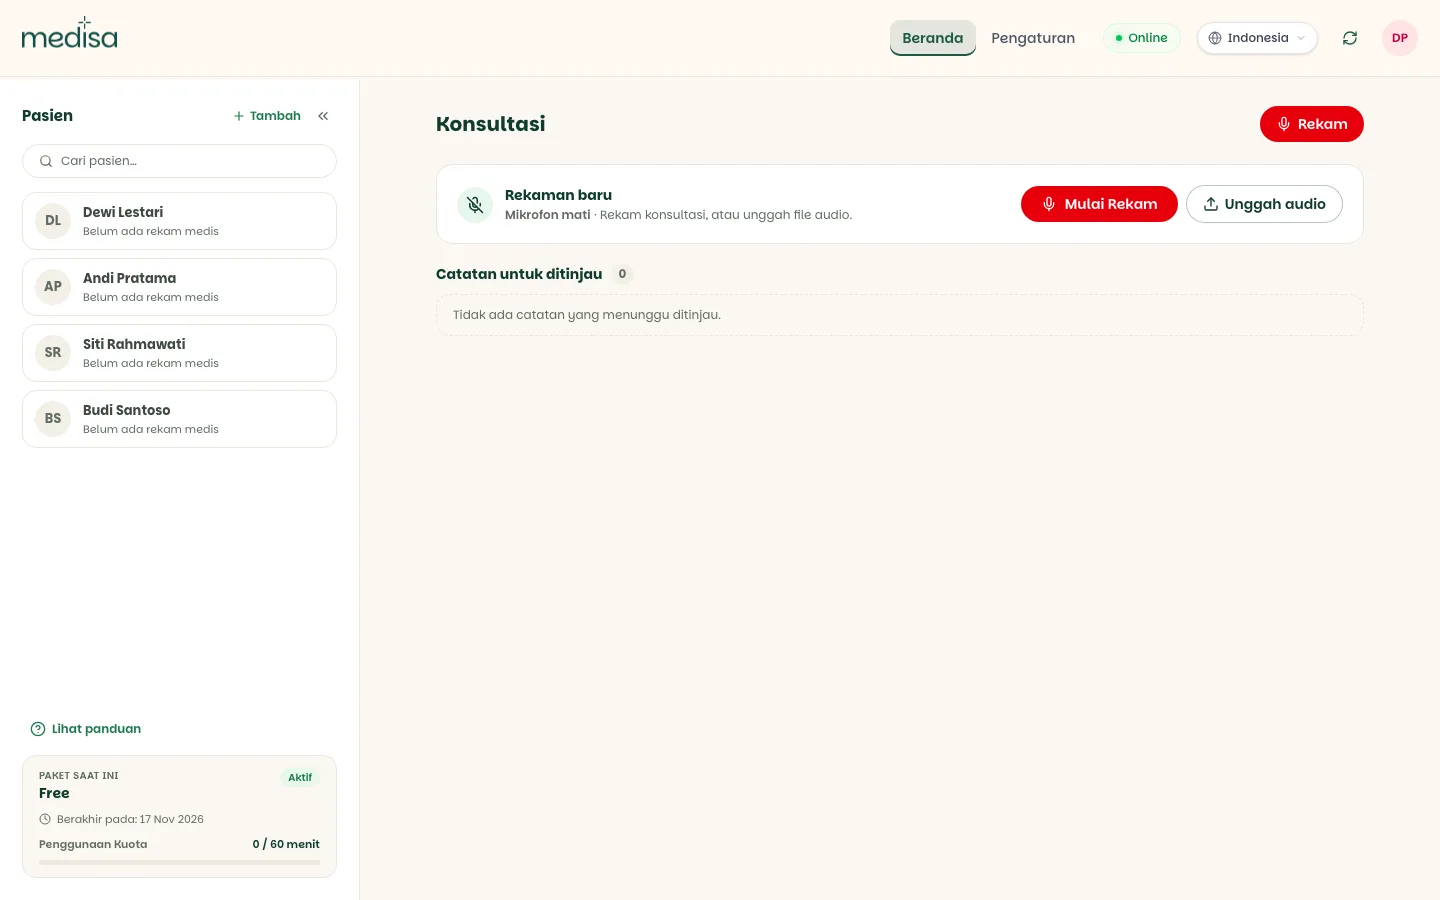
| Area | What it holds |
|---|---|
| Patients (left column) | Your patient list, the Search patients… box, and the + Add button. It can be collapsed for more room. |
| Record (next to the title) | A shortcut to start recording. While recording, the timer, pause, and finish buttons appear here too. |
| Unfinished recordings | Paused or interrupted recordings. This section only shows when it has something in it. See Pause & Unfinished Recordings. |
| New recording | Microphone status, the Start Recording button, and Upload audio. |
| Notes to review | Notes from your recordings that are waiting to be checked, to have a patient assigned, or to be saved. |
| Current Plan | Plan name, validity, and quota minutes used. |
First time here? Press View guide below the patient list. A short tour walks through each of these areas.
Steps
Press Start Recording in the New recording panel, or Record next to the page title.
Read the Recording Consent & Data Protection dialog, then press Continue. By continuing, you confirm that the patient has agreed to being recorded.
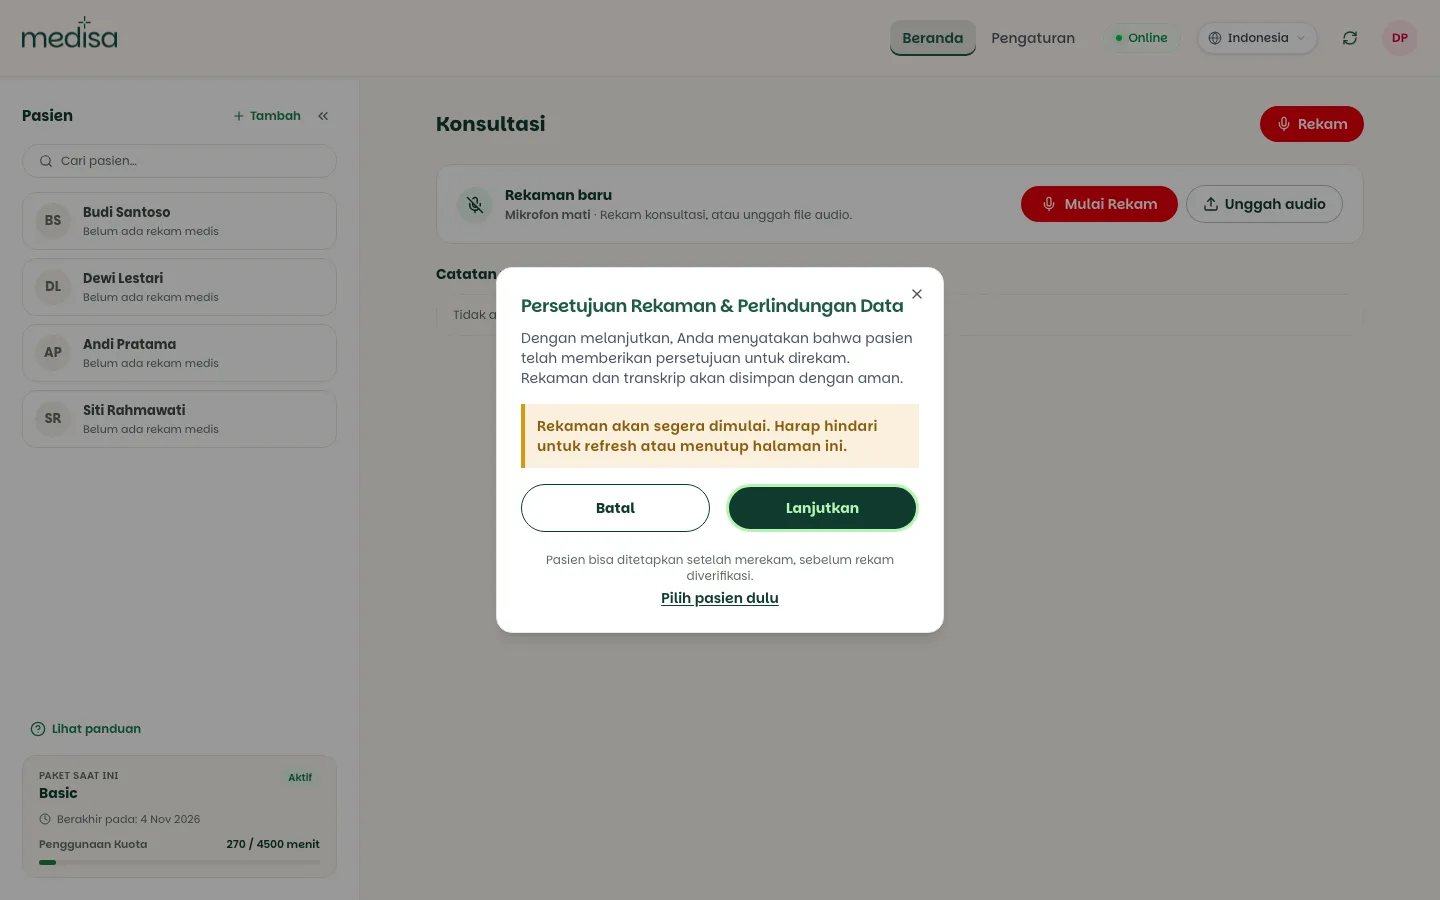
Want to choose the patient before recording? Press Choose the patient first below the buttons, then pick a registered patient or register a new one. If you skip it, the patient is assigned later while you review the note.
Hold the consultation as usual. The panel switches to Recording now, with a sound indicator and the elapsed time.
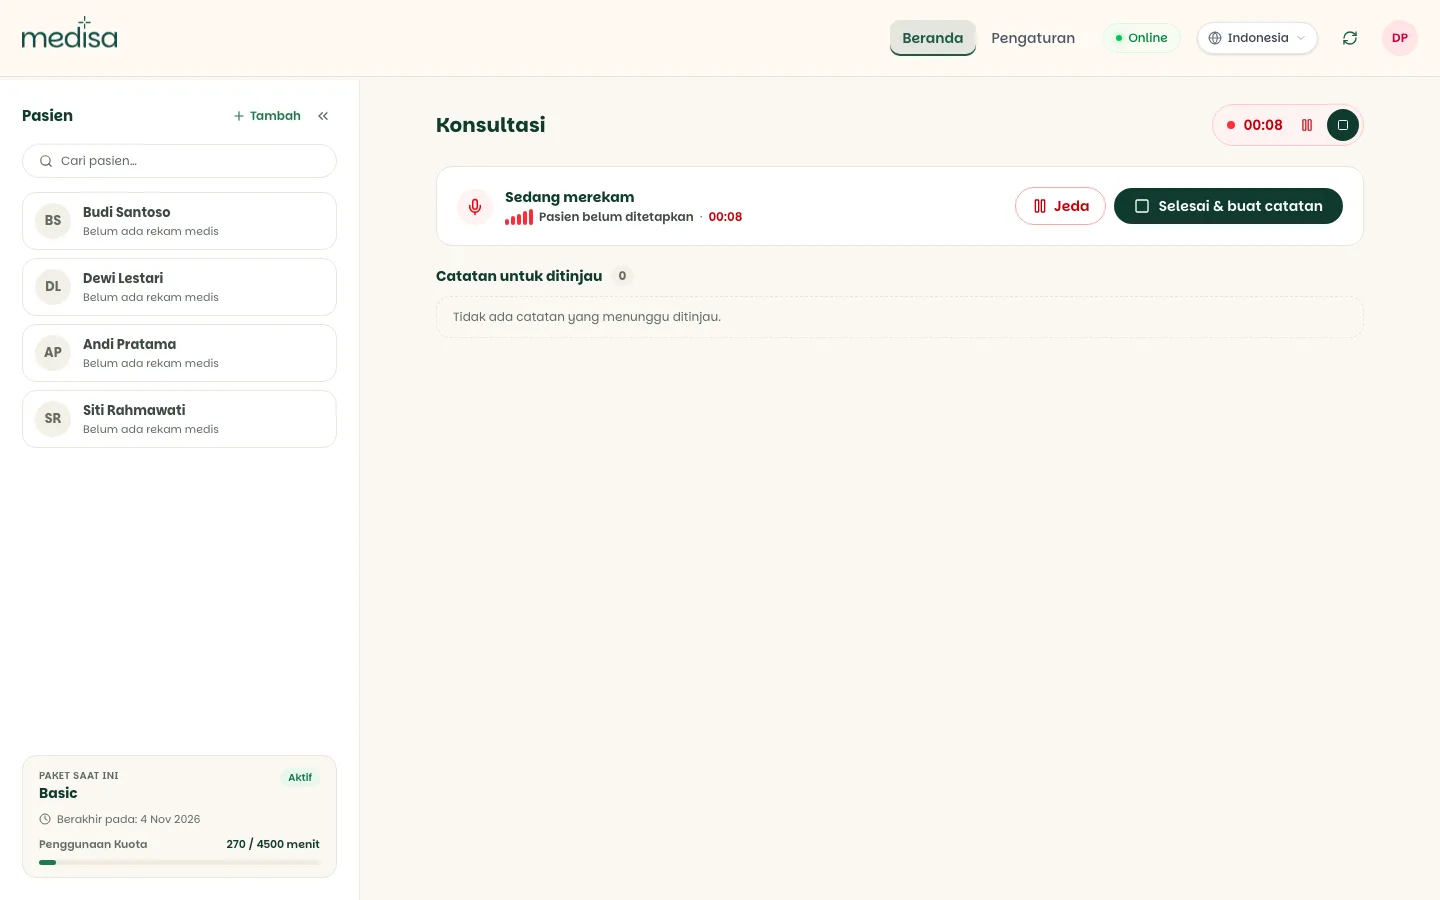
Audio is saved to the device every 5 seconds while recording runs.
Need to stop for a moment, for example to examine the patient or take a call? Press Pause. See Pause & Unfinished Recordings.
When the consultation is over, press Finish & create note. The recording is uploaded, then Medisa transcribes it and drafts the SOAP note.
The Recording Is Being Processed dialog means you don't have to wait. Press Continue and get on with something else, or record the next patient right away.
The note appears under Notes to review. Its status changes from Creating note to Ready for review.
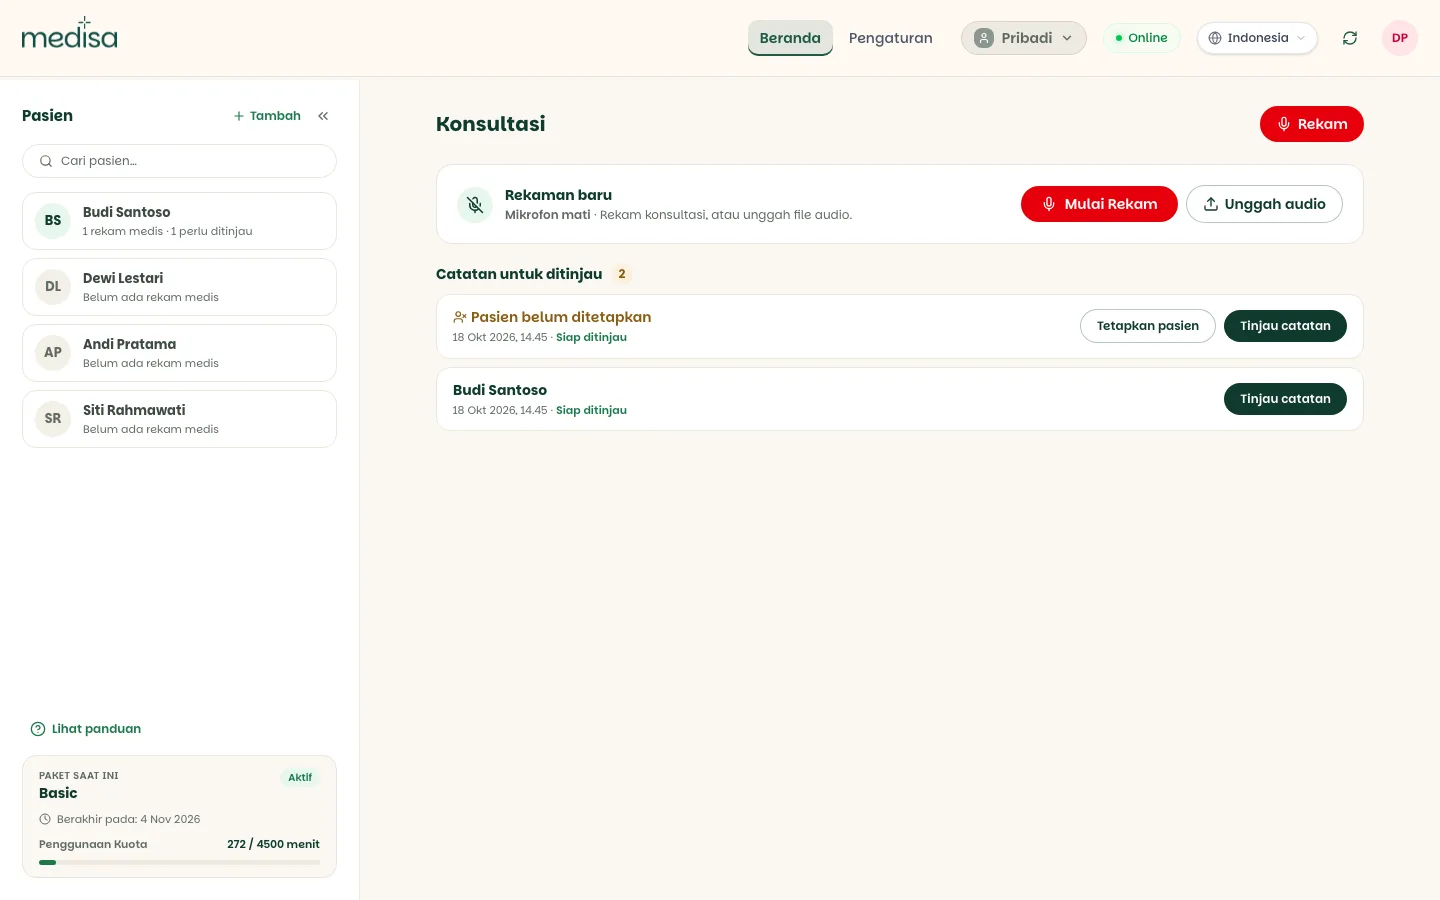
Press Review note to open it. If no patient was chosen while recording, the note shows Assign a patient to this recording before verifying it. Press Choose patient for a registered patient, or New patient to register one on the spot.
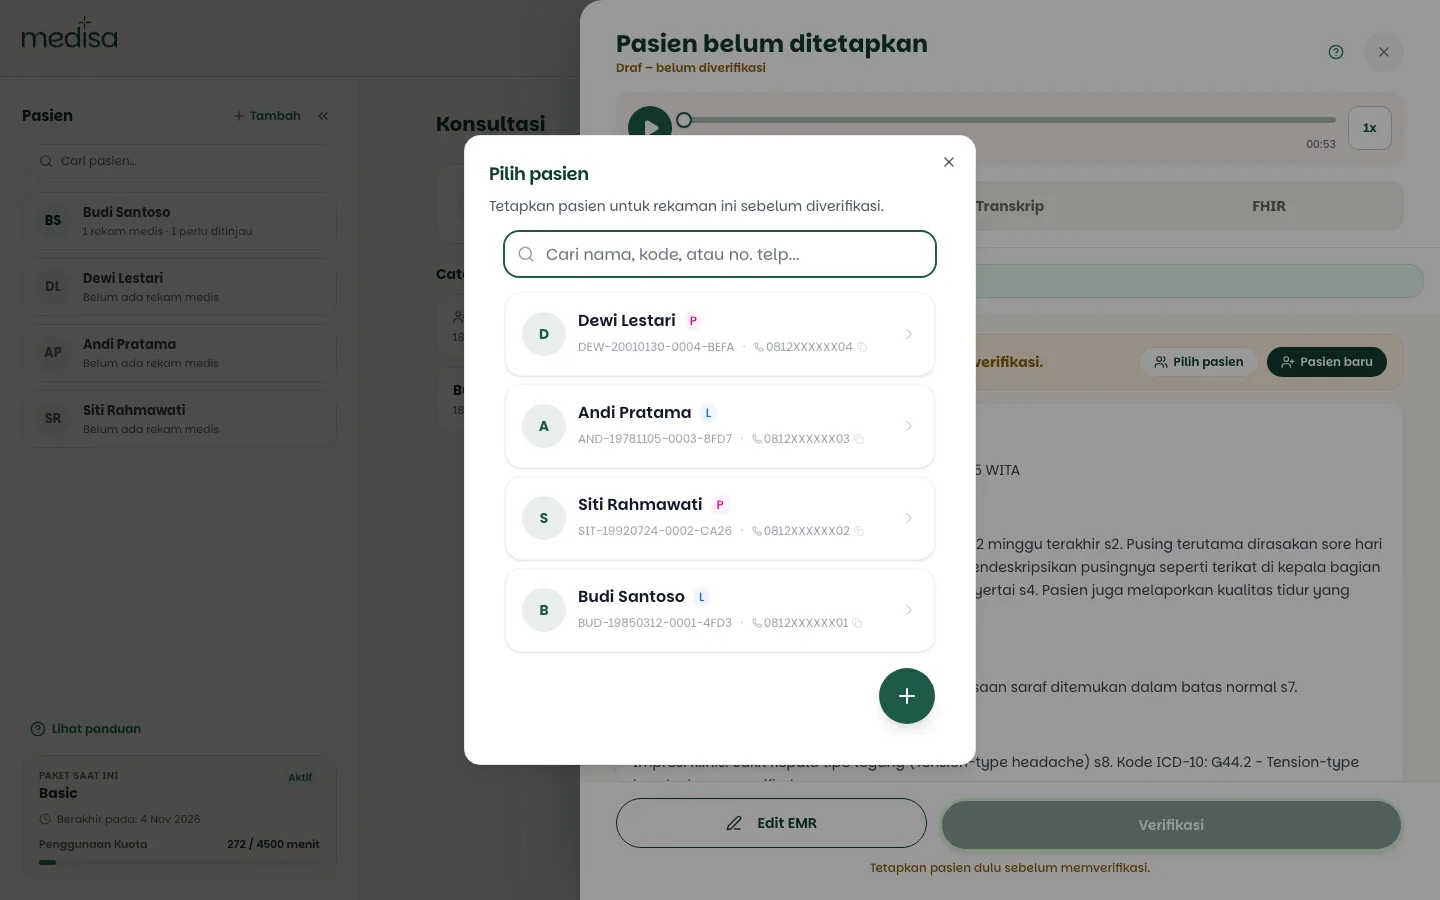
Once the patient is chosen, the note's title changes to the patient's name, a Recording assigned to confirmation appears, and the Verify button becomes active.
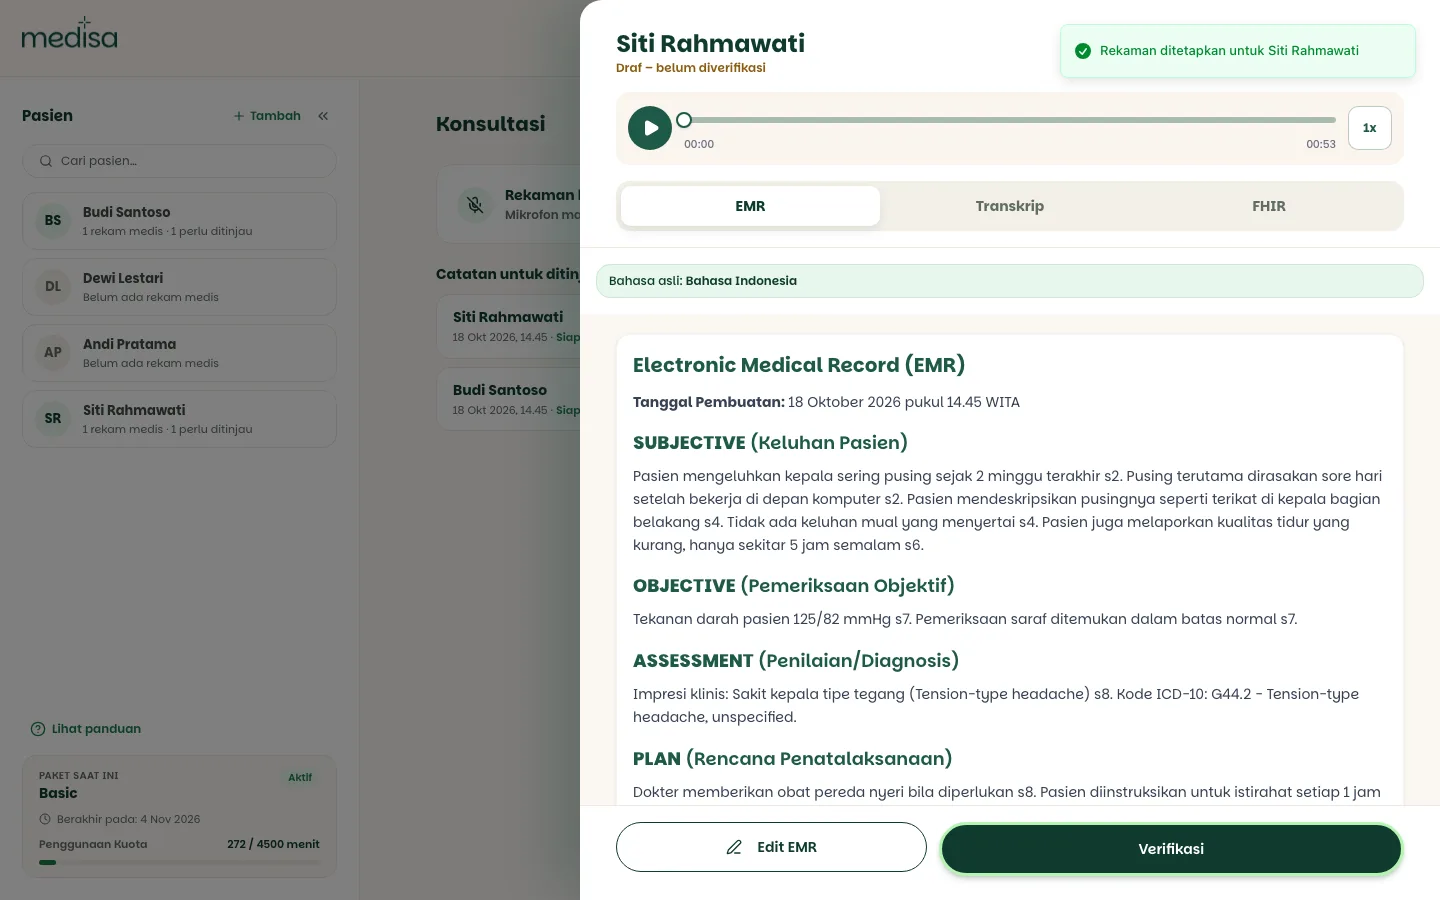
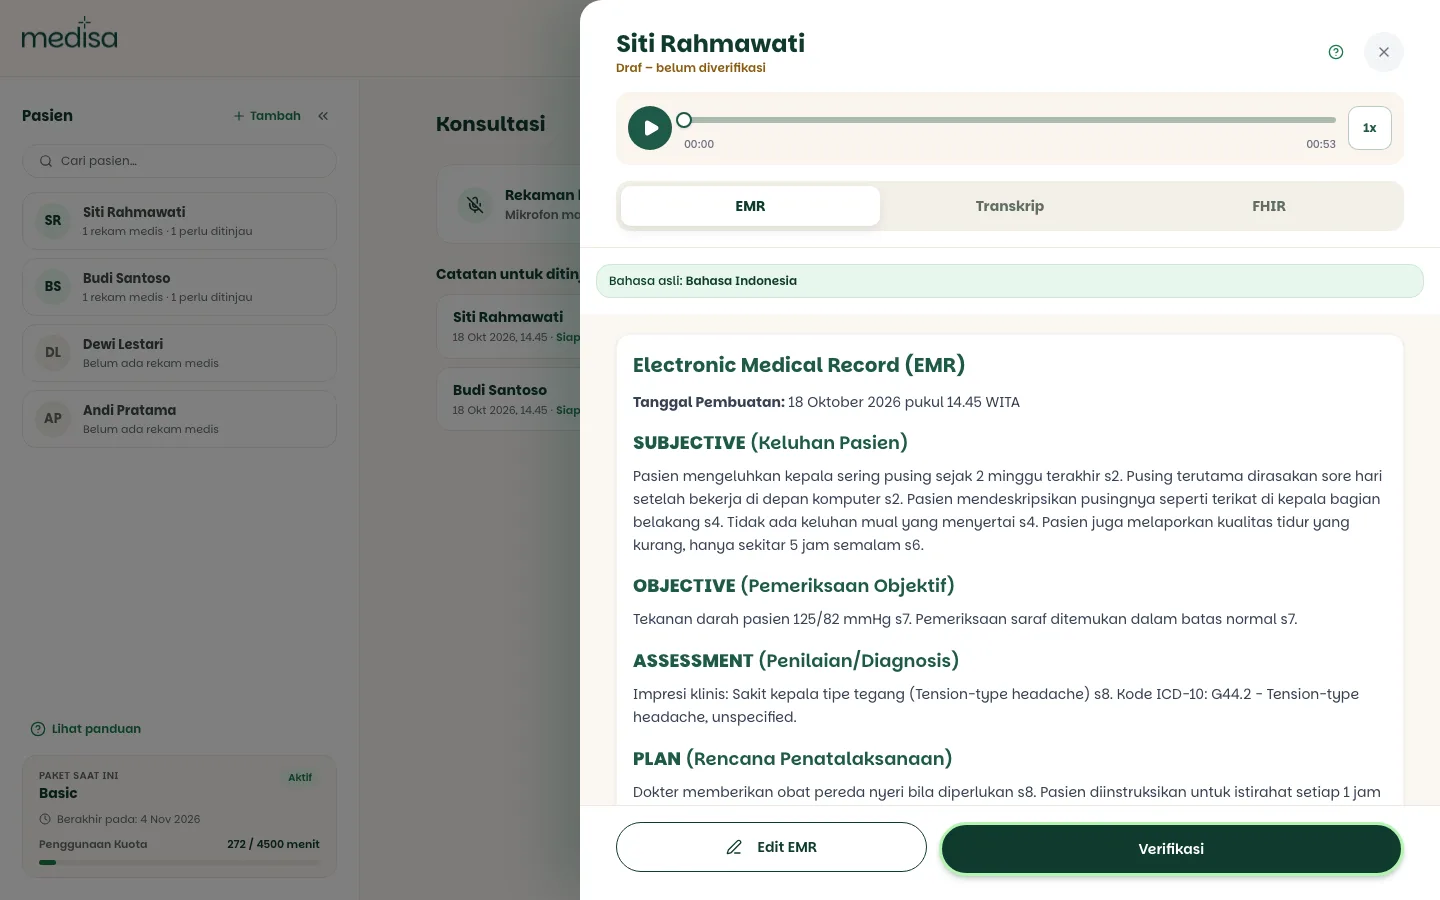
Read the result, correct it if needed, then press Verify once it is right.
Recording from the patient's page
If you already know the patient, pick their name in the Patients list. Their page opens, and the Record button on that page links the recording to that patient straight away. This way you don't have to assign the patient again while reviewing.
On a phone, the home screen shows Recent patients as quick picks.
Reading the result
AI drafts must be reviewed by the doctor
The generated SOAP note is a draft, not a final document. Until it is verified, you have not signed it off. Read it, correct it if needed, and only then verify.
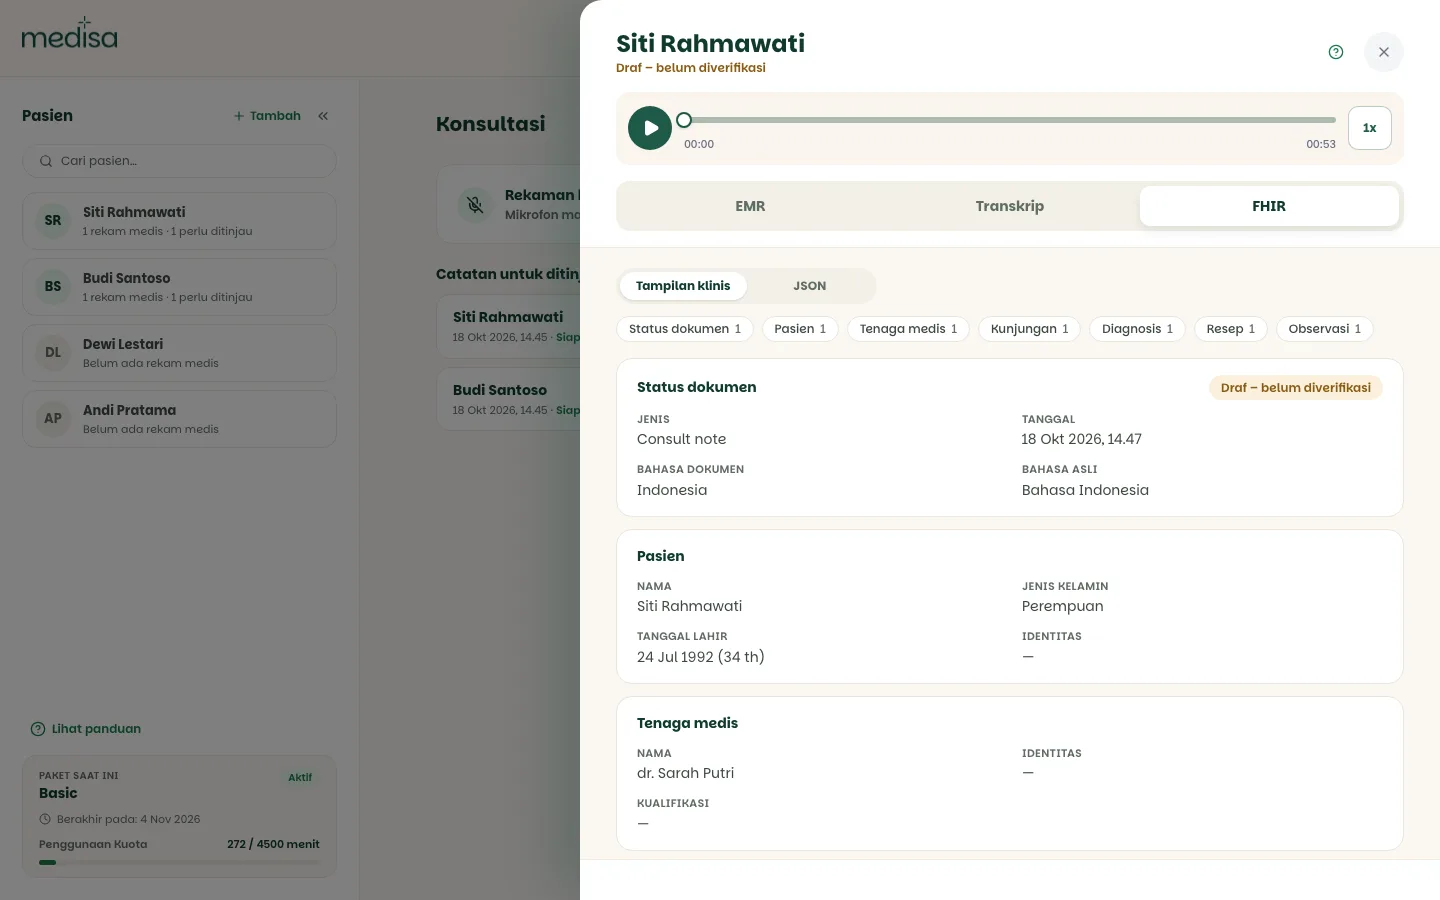
The note opens in a side panel with an audio player at the top and three tabs:
| Tab | What it holds |
|---|---|
| EMR | The SOAP note with citations and suggested ICD-10 codes |
| Transcript | The original conversation text, per speaker and time-stamped. See Transcription & Audio |
| FHIR | The same note in FHIR format, with a Clinical view and JSON, for use in other systems |
A few things that help while reviewing:
- Citations such as
s4ors9mark the part of the transcript a point is based on. Use them to check quickly whether the AI got it right. - ICD-10 codes in the Assessment are suggestions, and you still have to check them.
- The FHIR tab is built automatically from the SOAP note, without AI. Check it before using it in another system.
- Need to change the content? Press Edit EMR. See Editing an EMR.
Verifying needs a patient
Verify is only possible once the patient is assigned and their date of birth is filled in. Otherwise, Medisa shows Assign a patient before verifying. or Add the patient's date of birth before verifying.
Language
The transcript follows the spoken language
The spoken language is detected automatically, and the transcript is always in the conversation's original language. It is never translated or overwritten. The record shows its original language, for example "Original language: Bahasa Indonesia".
Only the SOAP content can be translated, and that runs in the background without holding up saving. Every translated view carries a marker that it was produced by AI.
If the connection drops or the page closes
Recordings are written to the device's storage first, not straight to the server. Because of that:
- A connection drop mid-consultation does not lose the recording. The upload resumes on its own once the device is back online.
- Page closed, reloaded, or the microphone disconnected? The audio up to that point is kept. The recording shows under Unfinished recordings labelled Recording interrupted, and you can resume it. See Pause & Unfinished Recordings.
- A failed upload is retried several times. If it still fails, the recording is kept on the device and you can send it again manually.
- Sending the same recording again does not charge quota twice.
Uploading existing audio
If the consultation was recorded with another tool, press Upload audio in the New recording panel. Supported formats: MP3, WAV, M4A, WEBM, and OGG, up to 50 MB per file. From there the flow is the same as a live recording: the note appears under Notes to review.
Troubleshooting
| Symptom | Most likely cause |
|---|---|
| The record button does not respond | Microphone permission has not been granted in the browser |
| Recording cannot start | Quota is used up. Check the Current Plan card |
| 3 recordings are still open | The open-recording limit is reached. Finish or remove one of them first |
| A note shows Note could not be created | Press Open & retry to see why |
| The Verify button cannot be used | The patient is not assigned, or the patient's date of birth is missing |
| The SOAP result feels thin | The audio was unclear. The microphone was too far away or the room was noisy |
| The recording landed in the wrong clinic | The active workspace was not the one you meant while recording |